
 Motomaxsfr
Search Product
How Do I Rebuild A Brake Caliper
The process of rebuilding a motorcycle brake caliper involves three key stages: Disassembly, Deep Cleaning, and Seal Replacement. The most important “trick” is to pump the pistons out using the bike’s own hydraulic brake pressure before you disconnect the brake lines—this saves you from needing an expensive air compressor or piston removal tool later. You will need a caliper rebuild kit (seals and dust boots), a bottle of fresh brake fluid, a pick tool (or a bent paperclip), detailed patience to scrape the seal grooves clean, and basic hand tools (sockets and wrenches). If you take your time to ensure the piston grooves are perfectly clean and use plenty of brake fluid as lubricant during assembly, you can restore factory-level braking performance in under two hours.
Tools Needed To Rebuild Motorcycle Brake Calipers
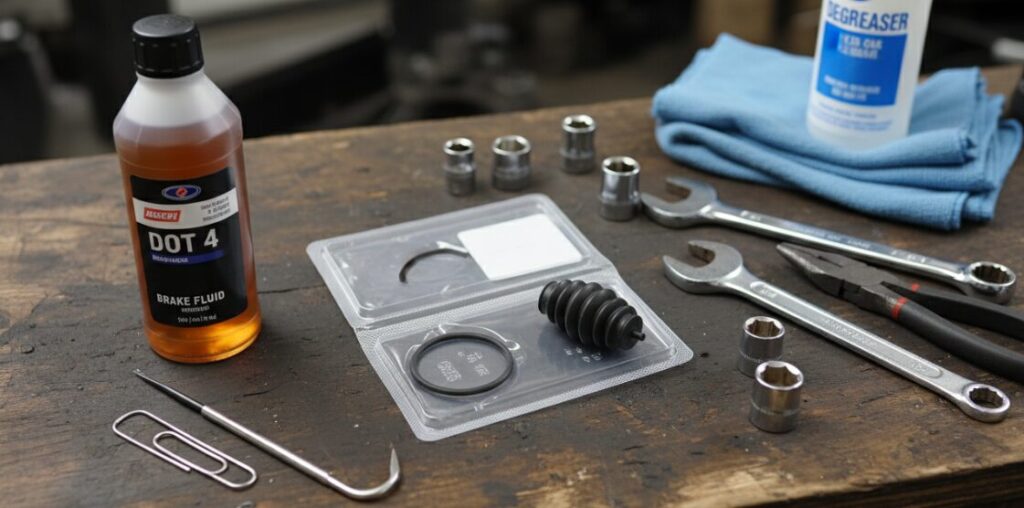
Please make sure you have these things on hand before you start:
- Caliper repair kit: must include hydraulic sealing ring and dust cover suitable for your model.
- New brake fluid: This is essential, both to provide hydraulic pressure during disassembly and to lubricate during assembly.
- Pick a needle or curved paper clip: When it comes to cleaning, this is the “special scraper” you use for hygiene “.
- Basic hand tools: a standard set of sockets and wrenches to remove the mounting bolts of the calipers.
- Rags and detergents: Don’t get oil everywhere. Keeping the working environment clean and tidy is a basic accomplishment.
Step 1: Taking The Pistons
The most troublesome part of restructuring calipers is taking the pistons, especially when they are already stuck. Professional repair shops usually use high-power air compressors to blow them out, but you don’t need to spend this money yourself, just use the motorcycle’s own system. The operation method is as follows:
- Do not disconnect the brake hose yet. Keep the hydraulic system intact.
- Loosen the fixing bolt of the caliper and let it be removed from the front fork or bracket and suspended in the air.
- Remove the brake pads.
- Gently pinch the brake handle. The hydraulic pressure generated by the upper pump is very strong-much stronger than the air pressure.
- Stare at the pistons and they will be slowly pushed out of the caliper body.
- When they are about to fall out completely, you disconnect the oil pipe and pull out the piston by hand.
This simple step directly saves the trouble of buying piston pliers or making compressed air, and any car friend who repairs cars in his garage can do it.
Step 2: Deep Cleaning And Sealing Groove Treatment
Once the calipers are taken apart, the most critical stage begins: cleaning. Inside the caliper cylinder, that is, the groove where the rubber sealing ring is placed. Over time, the brake fluid absorbs moisture, which can lead to the accumulation of white, hard-shelled corrosion (oxides) in these tanks. According to my experience, it is these deposits that push the sealing ring towards the piston, causing the piston to return to the position or even get stuck.
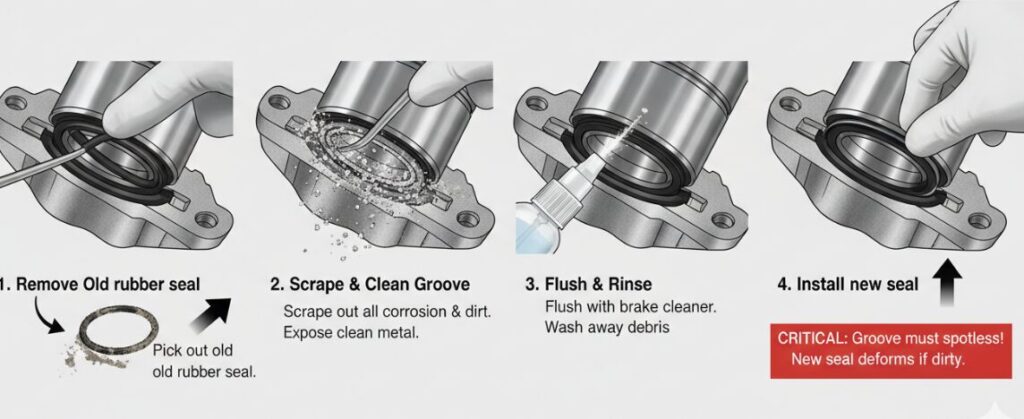
Cleaning process:
- Pick off the old rubber seal and throw it away.
- Pick up your pick needle (or that bent paper clip hook).
- Scrape the inside of the seal groove carefully. You must remove every bit of dirt and oxide until a clean metal surface is exposed.
- Flush the caliper body with brake cleaner or new brake fluid to wash away the debris just scraped off.
Note: Don’t worry about this step. If the groove is not cleaned up, the new sealing ring will be squeezed and deformed when it is installed, and your brakes will definitely drag.
Step 3: Replacement Of Seals And Lubrication
Finally it is assembled. Our goal is to have all the parts come home smoothly, with no frictional resistance and no damage to the new rubber parts.
Lubrication is key: Dry rubber rubs against dry metal and the result is tearing the seal. You must use that new bottle of brake fluid without hesitation.
- Fully immerse the new sealing ring in the new brake fluid and install it in a clean groove.
- Fill the piston with new brake fluid.
- Fill the inner wall of the caliper cylinder with new brake fluid.
Just because you cleaned the seal groove thoroughly and lubricated it in place, you should theoretically push the piston back into the caliper body with only your thumb. There is no need to use loud clamps or violent knocks.
Author:Dex
I’m a dedicated DIY moto-mechanic with a passion for budget-friendly restorations. With years of garage experience, I specialize in teaching riders how to maintain their machines without expensive specialty tools. I believe that with patience and the right techniques—like the hydraulic piston removal trick—anyone can achieve factory-level safety at home.