 Motomaxsfr
Search Product
How Tight Should A Motorcycle Chain Be
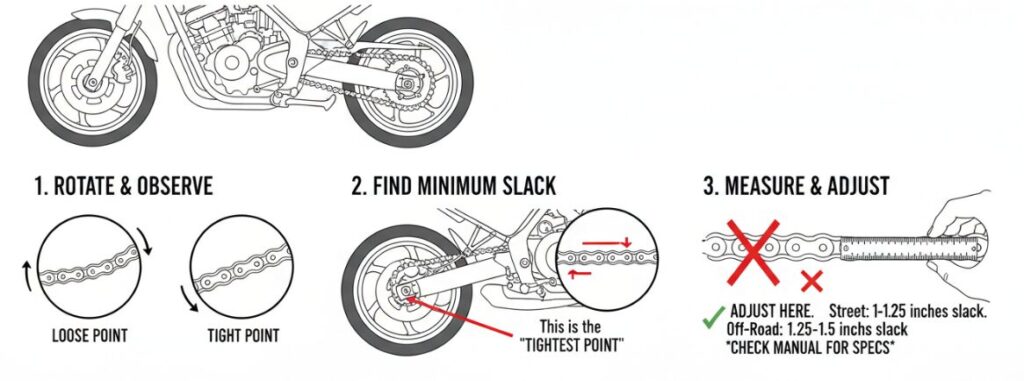
For most street motorcycles, the correct chain tension is typically 1 to 1.25 inches (25–30 mm) of vertical slack. However, this requirement changes based on suspension travel; dual-sport and dirt bikes generally need a looser setting of 1.25 to 1.5 inches (30–40 mm). To ensure an accurate reading, measure the total up-and-down movement at the chain’s midpoint while the bike is on its side stand. Crucially, you must rotate the rear wheel to find the chain’s tightest spot and measure there, as checking at a loose spot can lead to over-tightening. Always confirm these figures with the sticker on your swingarm.
Understanding Vertical Swing Amplitude
Regarding the old question of how tight should the motorcycle chain be, the general rule of thumb will vary greatly depending on the model you ride. This difference is mainly determined by the suspension stroke of the motorcycle.
Street motorcycle (25-30mm): Because of the short suspension travel of the street car, the distance between the rear rocker shaft and the rear axle does not change much during driving. Therefore, a tension range of 1 to 1.25 inches is sufficient, which can adapt to the suspension action without causing the chain to jam.
Dual-use and off-road motorcycles (30-40mm): These vehicles are designed to absorb huge impacts, which means that the swing arm swings in a much larger arc. When the suspension is compressed, the chain will be tightened. At this time, if a looser setting of 1.25 to 1.5 inches is not reserved, when the suspension is compressed to the end, the chain will either break directly or the secondary shaft oil seal (countershaft seal) will be destroyed-I have seen too many such tragedies caused by not leaving enough margin in the store.
Correct Attitude And Measurement Position
To get an accurate reading of the chain tension, the preparatory work is as important as the measurement itself.
According to the standard maintenance process of most models, the car should be placed on the side ladder. This position allows the suspension to settle naturally under the weight of the body. After the position is set, find the middle point of the chain-the section between the front small fly (countershaft sprocket) and the back tooth plate. This is the place where the chain has the largest movement space. You need to push up and down hard here to measure the total vertical displacement.
Finding The “Tightest Point”
When checking the chain tension, the most overlooked step is to ignore the uneven wear of the chain. Chains rarely stretch perfectly and evenly over time, and they usually appear “tight” and “loose” over time .
If you happen to measure the data at the “loose point” and adjust it according to the standard, the chain may become dangerously tight when the wheel turns to the tight point. In order to avoid this situation, be sure to slowly turn the rear wheel and check the tension in different positions. Once you find the point with the smallest swing (the “tightest point”), make the final measurement and adjustment there. This ensures that no matter how the rear wheels turn, the chain tension never exceeds the upper limit.
Check The Original Specifications
Although the 1-1.25 inches for street cars and 1.25-1.5 inches for off-road vehicles mentioned above are very reliable benchmarks, they are not a universal formula for all brands and models.
The exact tension required is calculated by the manufacturer based on the specific rocker geometry and chainring configuration. Therefore, the safest way is always to find the information sticker on the rear rocker arm of the motorcycle. If the sticker is worn out or can’t be seen clearly, go through your owner’s manual to confirm how tight your car should be adjusted.
Author: Alex Carte
With over 16 years of experience as a certified motorcycle mechanic and track rider, I specialize in preventative maintenance and bike safety. I wrote this guide to strictly follow factory specifications, helping you adjust your chain tension accurately for a smoother, safer ride.