
 Motomaxsfr
Search Product
How To Clean Motorcycle Chain
To clean a motorcycle chain correctly and safely, the first step must be to stabilize the frame.Using the lift frame and engaging in neutral is a basic operation. The next process is to spray a special chain degreaser (or kerosene) on the entire chain, focusing on the rollers and side plates to dissolve those stubborn road dirt. Use a three-sided brush to carefully scrub the four sides of the chain. Be sure to thoroughly remove the black sludge like “grinding paste”, otherwise they will wear your large and small flying tooth discs too quickly. After brushing, rinse with low-pressure water. After washing, dry it thoroughly with microfiber cloth or compressed air, and finally spray high-quality chain oil or chain wax on the inside of the chain while turning the rear wheel. In order to ensure longevity and riding safety, this maintenance should be done every 500-600 miles, or immediately after riding on a rainy day.

Step 1: Preparation And Safety
Before doing it, make sure the motorcycle is parked on level ground. Lifting the frame or large support is essential, because only by putting the rear wheel overhead can you turn the chain freely by hand. Safety reminder: Always keep neutral and turn off the engine. Cleaning the chain while it is idling or shifting gears is extremely dangerous.Once the finger is caught between the chain and the chainring, the consequences will be disastrous.
Step 2: Spraying Degreasing Agent
The core logic of the cleaning chain is to break down the old grease that has gone bad and contaminated. It is safest to use a special cleaning agent or kerosene. Many manufacturers recommend kerosene because it does not harm sensitive rubber seals while dissolving grease. Spray a large area of degreasing agent on the chain, especially to keep an eye on the rollers (middle moving parts) and side plates. After spraying, let it sit for a few minutes, giving the solvent a little time to penetrate and soften the “old scale” formed by mixing dust, salt and old lubricating oil .
Step 3: Brush Off Those “Grinding Paste”
After the sludge softens, it’s time to brush with strength. The three-sided brush is currently the most efficient tool, which can simultaneously handle the upper and lower sides of the chain. Your goal is to destroy the so-called “abrasive paste”. These abrasive silts are like liquid sandpaper. If left untreated, they will quickly smooth your toothed discs and cause uneven chain elongation. Be patient and brush each chain until the metal color is exposed and there is no grit.
Step 4: Flush And Protect The Seal Ring
After brushing, wash away the debris from the brush. There is a principle here: low-pressure water (such as garden hoses or buckets) must be used. Why avoid high-pressure water cannons? Because high-pressure water will destroy fragile O-, X-, or Z-seals. The function of these sealing rings is to lock the factory grease inside the pin shaft. Once the moisture is forcibly rushed in, the inside will corrode, causing the chain to “dead links”and be scrapped in advance.
Step 5: Dry Thoroughly
A wet chain won’t hold the lube. Wipe the entire chain with a clean microfiber cloth, or use compressed air to blow the moisture out of the gaps in the plates. Ensuring that the chain is dry not only prevents surface rust, but also ensures that the lubricant adheres directly to the metal, rather than being separated by water.
Step 6: Proper Lubrication Techniques
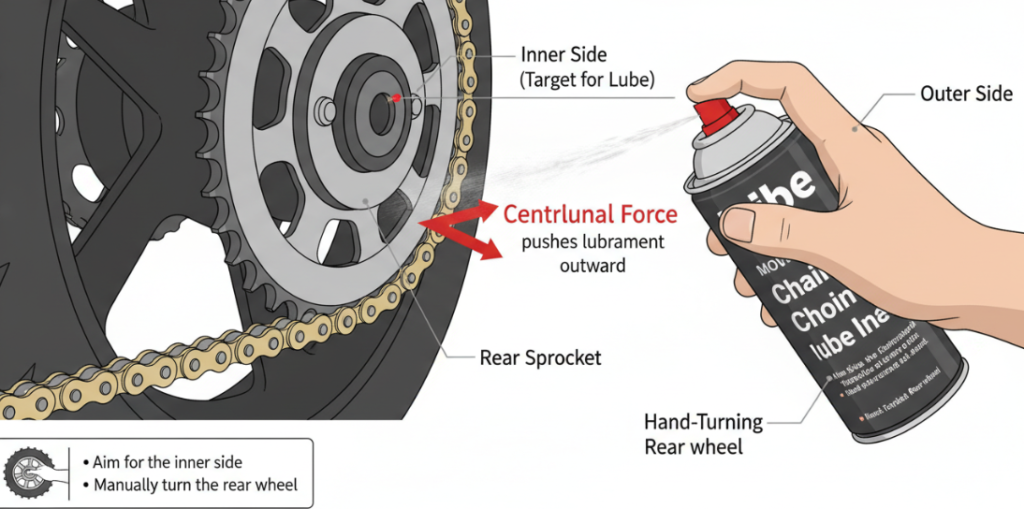
After the chain is washed and dried, apply high-quality chain oil or wax. In order to achieve the best protection effect, please remember two points: Aim for the inner side: the lubricating oil should be sprayed on the side of the chain against the toothed disc. When riding, centrifugal force will naturally push the lubricant outward toward the rollers. Manually turn: slowly turn the rear wheel by hand to ensure that each chain is evenly covered.
Maintenance Cycle
Persistence is the key when it comes to motorcycle safety. In order to keep the transmission system in peak condition, I recommend following the following intervals: Routine maintenance: every 500-600 miles (about 800-1000 kilometers). Maintenance after rain: Rain will wash away lubricating oil and bring in road salt. If you have just finished running in the rain, no matter how long it has been since the last maintenance, come back and clean and re-oil immediately to prevent oxidation. By developing this habit, you can not only extend the life of the chain and chainring, but also get a smoother, quieter and safer riding experience.
Author: Alex Rivera
“I’m a long-time motorcycle enthusiast and DIY mechanic with over 10 years of experience on the road. I believe that proper maintenance is the key to a bike’s performance and rider safety. I wrote this guide to help fellow riders master the essential skill of chain cleaning, ensuring their sprockets stay sharp and their journeys stay smooth.”
Related recommendations
-

What Is Sprocket Pitch
362Define Sprocket Pitch, Learn Why Matching Matters, And How To Measure Pin-To-Pin Distance For Any Drive System.
View details -
Motorcycle Chain Rust Solution
358Fix Motorcycle Chain Rust Fast. A Senior Mechanic’s Guide On How To Clean Surface Rust Safely And Spot Dangerous Failure Signs.
View details -
2 Piston VS 4 Piston Caliper: Analysis And Selection Guide
444Compare 2 Piston Brake Caliper Vs 4 Brake Piston Caliper. Learn The Pros & Cons, And If Upgrading Is Worth The Cost.
View details -
Will A 525 Chain Fit A 520 Sprocket
102A 525 Chain Fits A 520 Sprocket, But The Width Gap Causes Dangerous Side Slop, Premature Wear, And Derailment Risks.
View details


