
 Motomaxsfr
Search Product
How To Install Master Link Motorcycle Chain
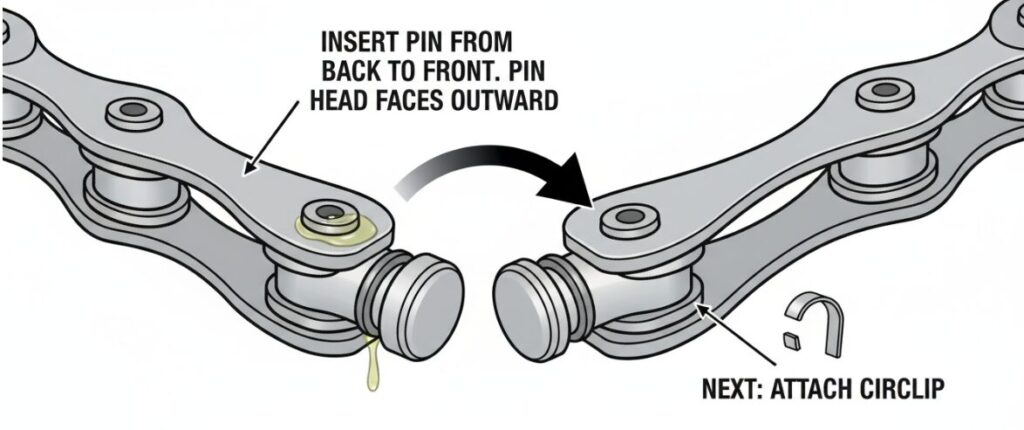
To install a master link on a motorcycle chain, begin by thoroughly greasing the pins and placing the two inner O-rings onto the master link. Insert the link through the chain ends from the back to the front. Install the remaining O-rings and press the outer side plate firmly onto the pins until the grooves are exposed. Finally, use pliers to snap the spring clip into the grooves, ensuring the closed end of the clip faces the direction of chain rotation for safety.
This video provides a visual guide on how to install a motorcycle chain master link:
Quick Steps:
- Grease & Insert: Lube the pins, add inner O-rings, and insert the link from the back.
- Press Plate: Add outer O-rings and press the side plate on (use a press tool or vice grips).
- Install Clip: Snap the clip on using needle-nose pliers.
- Verify Orientation: Ensure the clip’s closed end points towards the engine (on the top run).
The Tools You Need
Before doing it, make sure the tools at hand are handy. Handle these small parts carefully; the right tool can avoid damaging the O-ring or circlip.
- Nose pliers: Used to operate and push in the small circlip.
- Chain cutter/chain press tool (or small pliers): Used to press the side plate.
- Matching grease: Usually when buying a new joint, the package will come with a pouch.
Step 1: Lubricate And Place The Inboard O-Ring
How long the chain can last depends to a large extent on whether your lubrication is in place. Pick up the bag of grease attached to the hinge package, don’t save it, and coat the two pins of the hinge thickly.
After oiling, slide the first two O-rings (that is, the “inner” O-ring) to the bottom of the pin shaft. These sealing rings are the key line of defense to keep the mud and sand outside and lock the lubricating oil inside, so be sure to make sure they are flat on the chain plate.
Step 2: Thread The Hinge
Take the prepared joint (there is oil and inner O-ring on it at this time) and pull the two ends of the chain on the back tooth plate together for docking.
Direction is crucial: the hinges must be worn from the back of the chain to the front. In other words, the head of the pin should point to yourself (outside). This position is not negotiable, because you need to clearly see the outer chain plate and circlip in the next steps, and you must leave room for operation.
Step 3: Install The Outer O-Ring And Press The Chain Plate
Now that the pin is facing you and protrudes outside the chain, put the remaining two O-rings on it. Next, position the outer link plate with the pin.
Press in the chain plate: This step usually takes a little effort. You have to press the outer chain plate deep enough until the small slot (channels) at the top of the pin is completely exposed.
If you have a professional chain press tool, just press it in gently.
If you are using vice grips, I have to remind you in particular: be extremely careful not to pinch the O-ring flat or broken. Squeeze slowly and stop as soon as you see the circlip slot clearly exposed.
Step 4: Install The Spring Clip
This is the most obvious feature of the snap-on button. Align the circlip with the slot of the pin. Use pointed-nose pliers with one jaw against the pin and the other jaw against the tail of the circlip. Apply steady pressure and “collapse” it in. Usually you will hear or feel the “click” crisp sound; it means that it has been firmly sitting in the slot.
Step 5: The Circlip Direction
The most important safety point in learning to install chain joints is the opening direction of the circlip.
Why is “closed” so important?
The closed end of the circlip must face the direction of the chain.
When you look at the top half of the chain (top run), the chain is going in the direction of the front (engine). Therefore, the closed end (that is, the end of the arc) must point forward.
The logic behind this is simple: if you are riding and the chain rubs against a stone, a branch or a chain guide, the foreign object should hit the closed end of the circlip, which will only push it tighter. On the other hand, if the opening end faces forward, debris will easily catch the opening and directly collapse the circlip. Once the circlip flies, the chain falls apart for a few seconds, and no one wants to experience the disastrous consequences.
Final Inspection
Don’t rush to finish the work after loading, check your masterpiece times:
- Are all four O-rings in place? Have they been squeezed and deformed?
- Is the card spring completely stuck in the two slots?
- Is the closed end of the circlip pointing in the direction of rotation?
Author:Tom
I am a passionate motorcycle DIY mechanic focused on safe drivetrain maintenance. I specialize in breaking down technical repairs—like chain installations—into simple, precise steps to help riders get back on the road with confidence.