
 Motomaxsfr
Search Product
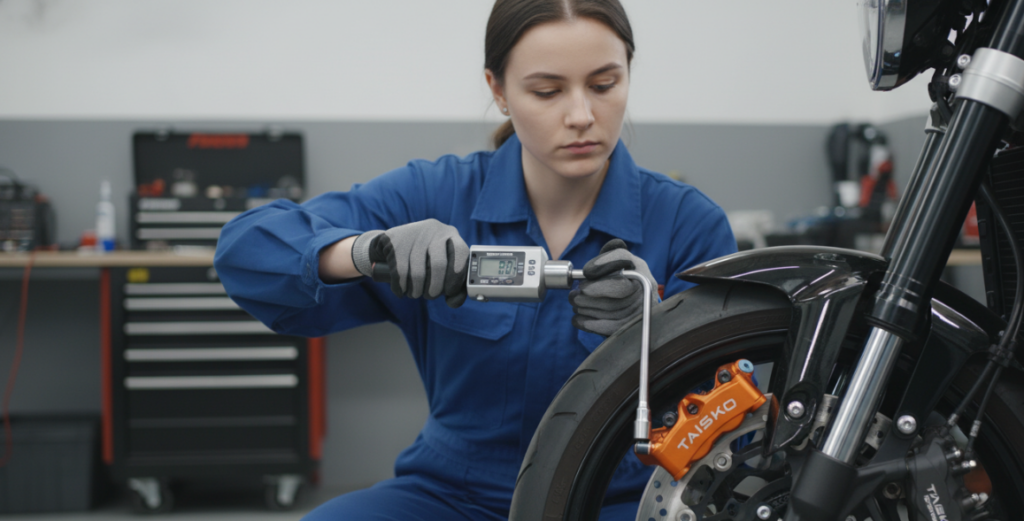
How To Remove Front Brake Caliper On Motorcycle
To remove the front brake calipers of the motorcycle, first, with the calipers still fixed on the front fork, slightly loosen the mounting bolts and brake pad pins using a socket wrench or an Allen key. After loosening the bolts, completely unscrew the mounting bolts and gently shake the caliper body to slightly compress the piston so that it can slide out of the brake disc without scratching the rim. It is essential that the caliper must be fixed to the motorcycle frame or front fork immediately using a sprung rope or S-hook; do not let the caliper assembly hang on the rubber brake hose, as this will cause internal stress and may cause brake fluid leakage. When removing the caliper, do not pull the front brake lever, otherwise it will cause the piston to overextend. When reinstalling, be sure to consult the service manual for the specific torque specifications required to ensure that the brake system is safe and effective.
Why Is It Important To Regulate Operations?
The front caliper is the core of the motorcycle’s braking system, and it must not be sloppy. If the disassembly method is wrong, the brake hose may be damaged, or the piston may be stuck or the brake may fail. Whether you want to change the brake pads, upgrade the disc, or simply want to do a deep cleaning of the calipers, according to the technical specifications is the premise to ensure safety.
Tool Preparation Before Hands-on

Before you do this job, you have to prepare these things:
- Socket wrench or high-quality hexagon socket: don’t use that inferior tool, or you’ll cry if the screw slips your head.
- Elastic rope or S hook: don’t look down on this thing, it is used to hang calipers.
- Vehicle maintenance manual: check the torque parameters must be used, don’t blindly believe in your own feel.
- Clean cloth: pad on the wheel hub, so as not to scratch the beautiful paint.
Detailed Disassembly Steps
Step1: Loosen the screws in advance
Before the frame is up or the wheels are removed, while the caliper is still firmly fixed on the shock absorber, use a torque wrench to “loosen” the fixing bolts of the caliper and the brake pad pins a little bit. I found that many people like to remove the calipers and then screw the pins. At that time, the calipers were swinging and there was no effort at all. It was easy to slip and hurt the installation position.
Step2: Remove the caliper and protect the disc
Once the bolts are loosened, they can be screwed out completely. When removing the caliper body, I suggest to gently shake the caliper left and right, so that the piston can be pressed back a little bit, and after freeing up the gap, the caliper can smoothly slide out of the brake disc. The action should be light, don’t pry hard, otherwise the metal friction will easily leave a mark on the edge of the hub.
Step3: Prohibited Items: Find a Backer for Caliper
Once the caliper is separated from the fork tube, it must be hung on the frame or shock absorber with elastic rope or S hook immediately. This is a hard rule in the industry. I ‘ve seen too many people just throw the caliper and let it hang directly from the rubber brake hose. The weight of the caliper will cause huge traction inside the oil pipe, produce micro cracks invisible to the eye, and cause brake oil leakage or even sudden failure.
Step4: Avoid damage to the hydraulic system
During the period when the caliper is removed, never pinch the front brake handle. Once you have pinched the brake, the hydraulic pressure will directly push the piston out of the caliper seat. This kind of situation is called “piston overload pop-up”. When the brake oil leaks, the process of plugging back and venting air can make your head bigger.
Reassembly And Safety Check
When you finally put it back, don’t feel “tightened”. Go through your manual and check the specific torque value of the model. Use a torque wrench to ensure that the caliper is installed stably without damaging the threads on the fork tube. After the refill, remember to pinch the brake handle several times until the hand feels hard and firm. Before going out, try a car at low speed to make sure the brake feedback is normal before going on the road.
Author: Alex Miller
I am a veteran motorcycle technician with over a decade of hands-on repair experience. Having seen many DIY enthusiasts accidentally turn simple maintenance into costly ‘overhauls,’ I am passionate about sharing practical, safety-first technical guides.
Related recommendations
-

Why Motorcycle Chain Loose
38Dealing With A Loose Motorcycle Chain? Discover The Causes, How To Adjust It, And When It’S Time For A Full Replacement.
View details -
How Motorcycle Sprockets Work
393Understand How Motorcycle Sprockets Work. Learn How Gear Ratios Transfer Power To Balance Torque And Top Speed.
View details -
Should I Change My Sprockets With My Chain
166Yes, You Should Replace Sprockets With Your Chain. Learn Why Synchronization Is Vital For Safety And Performance.
View details -
Motorcycle Chain Loose Symptoms and Solutions
309Timely Detection And Resolution Of These 5 Symptoms Of Loose Motorcycle Chains
View details


