
 Motomaxsfr
Search Product
How To Tighten A Dirt Bike Chain
To tighten a dirt bike chain correctly, you must first repair the frame to the frame to ensure that the rear wheels are off the ground. Next, follow my standard process:first, loosen the rear axle nut with a socket wrench. Next, turn the adjusting bolts on both sides of the rocker arm clockwise. You have to alternate left and right, twisting only 1 small dots at a time to make sure that the two sides are in step, so that you can smoothly push the axle back. The next step is to measure the chain open. Push the chain up against the rocker arm, the ideal tension is usually between 20mm and 30mm, or about the width of two to three fingers (measured from the chain slider). The specific value is best to refer to the factory manual of your car. Different brands do have subtle differences and cannot be generalized. There is a key detail here: it must be ensured that the rear wheels are aligned. You have to carefully align the scale lines on both sides of the rocker arm. If the left and right are asymmetrical, not only the sprocket will be abnormally worn, but there is even a risk of chain breakage. As a final step, use a torque wrench to tighten the shaft nut to the specified value. After screwing, please remember to check the chain again for the 1 time, because in the process of locking the nut, the chain will often become tighter again due to the force.
Prepare The Tools
Before you start work, I suggest you find all the tools and don’t wait for half of them to go through the boxes and cabinets. Even if you feel good, a torque wrench is also necessary.
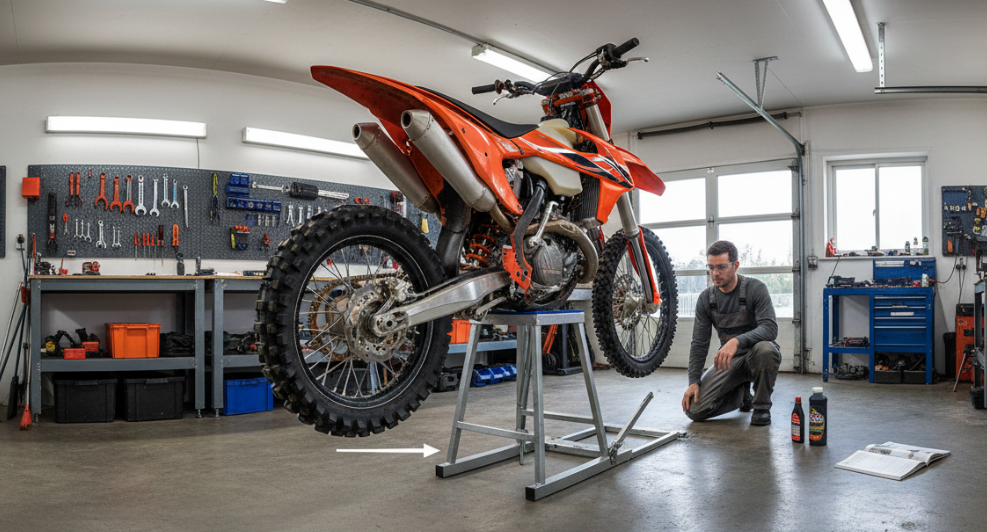
- Off-road motorcycle frame: the rear wheel must be completely suspended.
- Socket wrench set: specially used to deal with the rear axle large nut.
- Open-end wrench: for adjusting bolts and lock nuts.
- Torque wrench: the final tightening must be according to the manufacturer’s value, can not rely on “feel”.
- Tape measure or ruler: Measure precise sag.
Detailed Operation Steps
Step 1: Rack And Preparation
Put your car firmly on the lifting frame. It must be emphasized that the rear wheels must be off the ground. This is to release the suspension pressure and keep the swing arm in a natural arc, so that the measured chain tightness is accurate.
Step 2: Loosen The Rear Axle Nut
Find the large nut on the rear axle and unscrew it with a suitable socket wrench. Note that you don’t need to remove it completely, just loosen it until the rear wheel can move back and forth along the adjuster on the swing arm.
Step 3: Adjust Chain Tension
Do you see the adjustment bolt at the end of the swing arm? If your car has a lock nut, loosen it first. Turn the adjusting bolt clockwise, the rear wheel will be pulled back, the chain will become tight. Tip: the left and right sides should be operated alternately, only 1/4 or 1/8 turn at a time, and the adjustment amount on both sides should be completely consistent.
Step 4: Measure Chain Tightness
Measured at the tightest point of the chain (usually the midpoint of the front and back discs above the swing arm). Push the chain up in the direction of the swing arm, the ideal gap is usually between 20mm and 30mm. If you don’t have a ruler at hand, the common “soil method” in the circle is the width of 2 to 3 fingers. However, I have to remind you that the manual requirements of each brand and even each model are different. Please look through the manual to confirm after adjustment.
Step 5: Check Rear Wheel Alignment
This is as important as tightness, but it is always overlooked. Looking at the alignment scales on both sides of the swing arm, the axle blocks must be in exactly the same position. If the wheel is crooked, your teeth will wear out quickly and may even cause the chain to fall off directly at high speeds.
Step 6: Final Fastening And Re-inspection
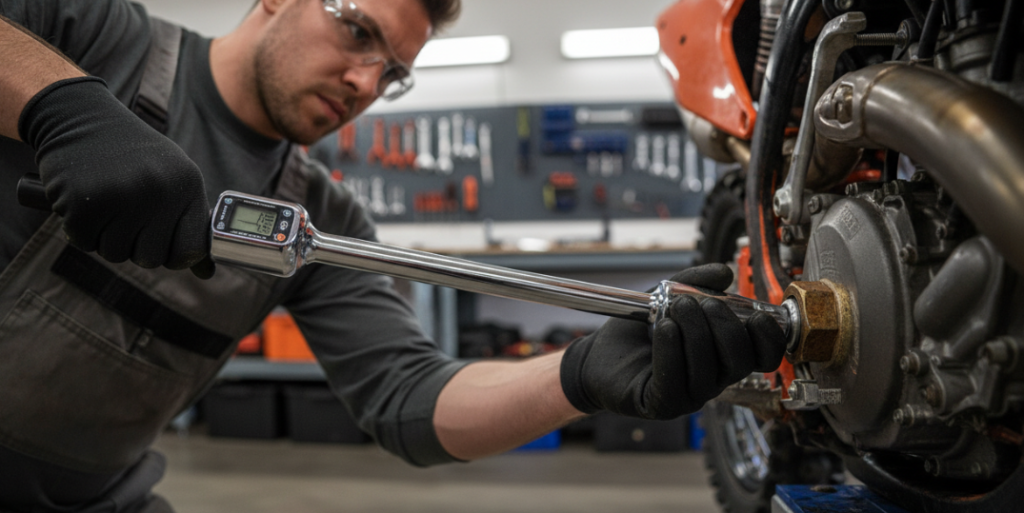
After confirming that there is no problem with tightness and alignment, use a torque wrench to tighten the rear axle nut according to the value specified by the manufacturer. The most critical step: after locking the nut, the tightness must be measured again 1 times. Because in the process of tightening the nut, the rear wheel tends to jump forward or backward a little, causing the chain to become tight. If you find it too tight, don’t be lazy and re-adjust it.
Why Is Correct Chain Tension Important?
The chain has not been adjusted, so it is not only maintenance that is not in place. It is really a potential safety hazard.
- Too loose: the chain may drop the chain, lock the rear wheel and make you crash the car, or crack the engine case directly, then you will have to spend a lot of money to repair the engine.
- Too tight: This will put huge pressure on the secondary shaft oil seal and rear shock. When the suspension is compressed, the chain will be pulled tighter, which will not only damage the bearing, but may even break the chain directly.
According to this method, the life of your chain and tooth plate can be extended a lot. Most importantly, you have a better heart when riding on the mountain or on the track.
Author: Alex Thompson
As a lifelong dirt bike enthusiast and hobbyist mechanic, I’ve spent countless hours in the garage and on the track. I know firsthand how a poorly maintained chain can compromise your bike’s performance and your safety. I’m passionate about sharing practical maintenance tips—like mastering the perfect 20-30mm chain slack—to help fellow riders keep their bikes in peak condition and stay safe on every trail.
The prev: How To Measure Sprocket SizeThe next: How Often Should I Lube My Motorcycle Chain
Related recommendations
-

What Are Sprockets Used For
101Learn What Sprockets Are Used For, How They Bridge Distances Via Chains, And Their Role In Converting Engine Torque.
View details -
What Tools Do I Need To Tighten My Motorcycle Chain
391Learn Exactly What Tools You Need To Tighten Your Motorcycle Chain, From Paddock Stands To Torque Wrenches. Get It Done Right.
View details -
How Often Should I Lube My Motorcycle Chain
166Lube Your Motorcycle Chain Every 300-600 Miles. Learn Why Rain, Dirt, And Cleaning Matter For Your O-Ring Chain Life.
View details -
Do You Need A Chain Guard On A Motorcycle
225Do You Need A Chain Guard? No, But You Risk Grease Fling, Injury, And Fines. See Why A Custom Guard Is The Safer Choice.
View details


