
 Motomaxsfr
Search Product
Sprocket Assembly Replacement Lightweight Motorcycles
Replacing a sprocket assembly on a light motorcycle typically takes 60 to 90 minutes. The process involves four steps:
Preparation stage: At this time, the chain is still tight, just by force to loosen the nut of the rear axle and sprocket.
Disassembly stage: remove the rear wheel, and then remove the worn old sprocket assembly.
Installation stage: Fix the new sprocket with blue thread glue, and tighten the bolts in a star-shaped cross manner to ensure that it is evenly stressed.
Assembly and calibration: put the wheel back, and then adjust the tightness of the chain to the range specified by the manufacturer, generally 20-30mm.
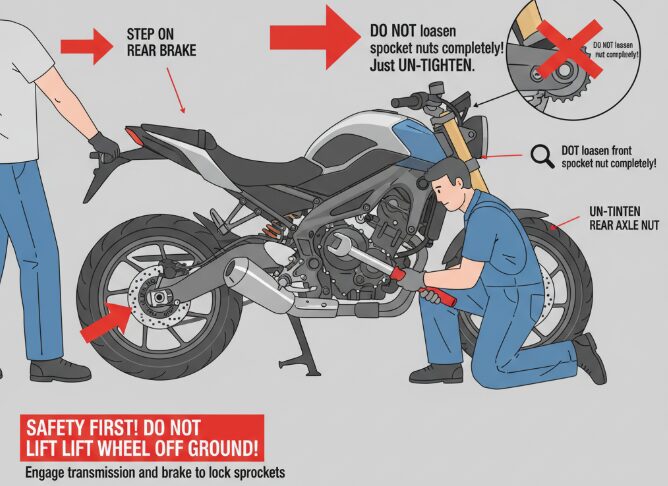
Step 1: Preparation
This step is very critical and directly affects the smoothness and safety of the entire process behind. To put it bluntly, the core of this step is to use the weight of the motorcycle itself and the tension of the transmission system to help us save effort.
Loosen critical fasteners: First put the motorcycle in gear, don’t put the car up, let the rear wheel stay firmly on the ground. If someone can help you step on the rear brake, it will be more stable. In this way, the entire transmission system is locked, and the sprocket can’t turn if it wants. At this time, you can use a longer lever or socket wrench to “don’t” loosen the nuts on the front and rear sprockets. My experience is that these nuts are very tight when they leave the factory, so you have to use some ingenuity. Remember, just “don’t” loose, don’t need to screw it off completely. If you screw these nuts when the wheels are overhead and can rotate freely, it will be much more laborious and not very safe. By the way, at this stage also loosen the big nut of the rear axle.
Step 2: Removal
The key nuts have been loosened, and now you can safely pick up the frame and start to dismantle it.
Rack the car and disassemble the wheel: Find a reliable rear wheel parking frame (Paddock Stand) and lift the rear of the car steadily. After confirming that the body is stable, the rear axle nut and chain adjuster can be completely unscrewed. Then, push the rear wheel forward, and once the chain is loose, it can be easily removed from the rear sprocket. After the chain is disengaged, pull out the rear axle completely and carefully take the entire rear wheel out of the rear swing arm.
Remove the old sprocket assembly: Place the removed wheels on a workbench or on a protected floor. Now you can remove all the nuts that have been loosened before and remove the old rear sprocket from the hub or cushion rubber. As for the front sprocket, it is usually necessary to remove a small cover on the outside. Then, unscrew the fixing nut of the front sprocket, and the old sprocket piece can be removed from the output shaft of the gearbox. If you dismantle it here, you can take off the old chain as well.
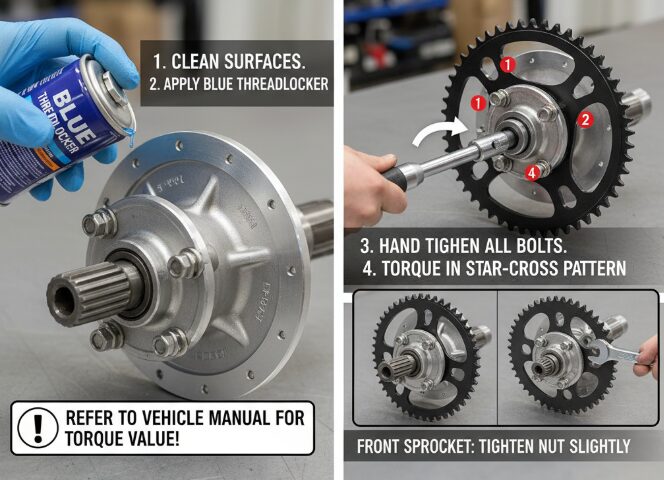
Step 3: Installation
This step requires precision and care, which is directly related to the life of the new parts and the safety of the vehicle.
Install the new sprocket: Before installing the new sprocket, be sure to clean the contact surface between the hub and the gearbox output shaft. Any impurity may cause uneven installation of the sprocket. Put the new rear sprocket on the hub, and then put a small drop of blue thread glue on the threads of each 1 fixing bolt. Don’t underestimate this thing, it is 1 kind of non-permanent adhesive, which can effectively prevent the bolts from loosening due to the vibration of daily riding, saving you a lot of trouble in the future.
Ensure uniform force: First tighten all the bolts by hand, then take out your torque wrench and start tightening in the order of star cross. What do you mean? Tighten the 1 one first, then screw the 1 one directly opposite it, and so on, the same way you change the screws on the tires of the car. This approach allows the pressure to be evenly distributed over the entire sprocket, preventing it from deforming during installation and ensuring it fits perfectly with the hub. The tightening force must refer to the torque value in your vehicle’s user manual. The same is true for the front sprocket. Install it and then tighten the nut slightly.
Step 4: Reassembly And Alignment
This is the final finishing touches and a crucial step in determining the performance and safety of your motorcycle.
Reinstall the wheel and chain: Reinstall the rear wheel back to the rear rocker arm, and pay attention to the correct position of the brake calipers and various spacers. First pass the rear axle through a part, then wrap the new chain around the front and rear sprockets, and finally pass the axle completely through.
Adjust chain tightness: The wheels are installed, but the rear axle nuts are not tightened yet. Now adjust the tension of the chain. Find the middle point of the lower half of the chain and measure its range of motion in the vertical direction. Adjust the chain adjusters on both sides of the rear rocker until the range of movement of the chain is within the standard specified by your manufacturer-usually between 20 and 30mm. There is a very important point here: it must be ensured that the adjustment scales on both sides of the rear rocker arm are exactly the same. This can ensure that your rear wheels and front wheels are in a straight line, otherwise it will cause abnormal wear of the sprocket chain and even affect the handling.
Final tightening torque: When the chain tightness and wheel straightness are perfectly adjusted, use your torque wrench to tighten the rear axle nut according to the specified torque value. The last step is to put the motorcycle back on the ground, put it in the 1 gear, step on the rear brake, and use the same method to tighten the nut of the front sprocket to the specified torque value. Here, the whole set of sprocket replacement work is done.
Author:Billy
For me, motorcycling is more than just riding—it’s about understanding the machine from the inside out. There’s a unique satisfaction that comes from feeling the improved throttle response and knowing you made it happen yourself. I created this walkthrough to share that feeling. This isn’t just a set of instructions; it’s a guide to empowering yourself as a rider and a mechanic. My passion is helping others discover how capable they truly are when it comes to maintaining the bikes they love.