
 Motomaxsfr
Search Product
How To Measure Sprocket Size
To accurately measure the size of the sprocket and complete the perfect replacement, you must stick to four core parameters: pitch, number of teeth, inner hole diameter and hole circle diameter (BCD, that is, bolt installation circle diameter). There is one of the most convenient tips: first according to the chain model (such as 420, 428, 520 or 530) to reverse. You take a digital vernier caliper to measure the distance from the tooth tip to the tooth tip. If it is 5/8 inch (about 15.875mm), it is basically a 520 or 530 chain. After the pitch is fixed, the rest is to count the number of teeth and measure the distance between the inner hole and the bolt hole. As long as these are matched, the installation is absolutely tight and there will be no bad things such as partial wear of the chain or premature scrapping.

Step 1: Determine The Pitch And Chain Model
Pitch is the basis of all measurements. In motorcycle circles, the size of chains and sprockets is usually represented by three-digit numbers. The so-called “pitch” refers to the linear distance between the center points of two adjacent teeth. My habit is to measure tooth tip to tooth tip directly with a caliper. According to this value, you can know which series your sprocket belongs to: 1/2 “(12.7mm) pitch: common in 420 and 428 series (usually off-road xiaolin road or small displacement commuter car). 5/8 “(15.875mm) pitch: this is standard for 520, 525 and 530 series (it is now used in mainstream street cars and imitation racing). 3/4 “(19.05mm) pitch: belongs to the 630 series (usually found on some old heavy-weight trucks).
Step 2: Count The Number Of Teeth (T)
The number of teeth determines the diameter of the sprocket, which is directly related to the transmission ratio of your vehicle. Front small sprocket (engine output shaft): The fewer teeth, the faster the speed, but the speed will drop. Large rear sprocket (rear wheel): The more teeth, the greater the torque, and the more aggressive the moment of starting. The measurement method has no technical content, just take a marker and draw around it. Unless you plan to adjust the transmission ratio, be sure to align with the original number of teeth when replacing new parts.
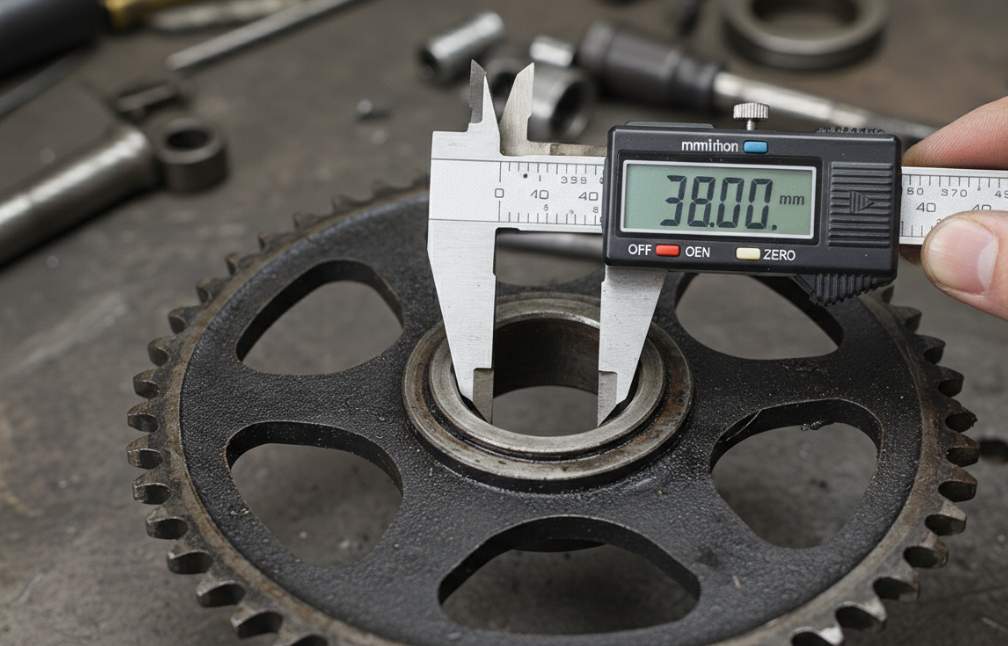
Step 3: Measurement Of Internal Aperture
The inner aperture is the large round hole in the middle of the sprocket. For the front sprocket, it must be tightly fitted on the spline of the engine output shaft; for the rear sprocket, it must be smoothly buckled on the hub boss. How to measure: Use the inner diameter claw of the vernier caliper to measure the widest part of the center hole. Here I have to remind the 1 sentence: Even if there is only a deviation of 1mm, the sprocket will be eccentric when installed. Not only will it shake badly when running, but the speed of chain wear at high speed can make you doubt your life.
Step 4: Determine The Hole Circle Diameter (BCD)
The rear sprocket of most motorcycles is bolted to the hub. To make sure the bolt holes are right, you have to calculate the BCD. To put it bluntly, it is the diameter of the circle connected by the center points of all mounting bolts. Even number of holes (4 holes or 6 holes): This is easy to do, directly measure the distance from the center to the center of the two holes. 5 hole pattern: You need to measure the distance from the center of one hole to the center of the farthest hole, and then look up the comparison table to determine the final BCD value. Lao shifu’s experience: don’t forget to measure the diameter of the bolt hole itself by the way to ensure that the original bolt can pass through, don’t wait to buy it back to find that the hole is small.
Author: Alex Mille
With years of experience in mechanical maintenance and drivetrain optimization, I specialize in helping DIYers and technicians find the perfect fit for their machinery. I wrote this guide to simplify the technical process of measuring sprocket pitch, bore, and bolt patterns, ensuring your equipment operates with maximum efficiency and minimal wear.
The prev: Does A Smaller Sprocket Increase SpeedThe next: How To Tighten A Dirt Bike Chain
Related recommendations
-

How Long Does A Motorcycle Chain Last
472Find out how long a motorcycle chain lasts, the factors affecting lifespan, and maintenance tips to ensure safety.
View details -
Is Gear Oil Good For Motorcycle Chain
25Discover Why Gear Oil Outperforms Sprays For Motorcycle Chains, Ensuring O-Ring Safety And A Cleaner, Smoother Ride.
View details -
Motorcycle Chain Dimensions interpretation and measurement
370Full Motorcycle Chain Dimensions Chart. Decode 520 Vs 530 Sizes, Understand Pitch & Width, And Learn How To Measure Your Chain Correctly.
View details -
How To Change A Motorcycle Chain
253Learn How To Change A Motorcycle Chain. Includes Removing Links, Replacing Sprockets, Riveting, And Torque Adjustments.
View details


